Showing posts with label last shaping. Show all posts

Tuesday, November 15

Shape that high heel last, baby! Shape!

After an embarrasingly quiet week for blog posts, it's been a less embarrasing week of actual shoemaking. Niina's second mockup is sent by mail and she's going to try them on and we'll propably take a look at them via a video chat. And if they're a fit, it means a step closer to their completion :)

Meanwhile my main concern has been Ms. Melissa's black knee-high boots, to which I started to shape the lasts. Her concern is a wider-than-usual ball of the foot, and a higher heel hight (9,5cm). Her lasts came ready today, so ladies & gents, let's take a look!
Shape, rattle & roll!

This is the beginning stage. an untouched high heel last.

I just dig that asymmetry! This is a front view and one can see the skill of the guy who originally made these. This asymmetry makes the shoes more elegant and even functional. Qualities that come rare on everyday common shoes. The art of last making is for some reason losing it's glorious heritage, and nowadays it's more common to see ugly and bulky lasts. Even for women.

She wanted a higher heel, so I started to build it to this area.

And here's the finalized shape.

After the heel hight, it's time to make the lasts more fitting to the clients foot. Here's a traditional ink print of the foot with measurements and the ball of the foot marked.

We'll place the last over the print and start to estimate the new required width of the last.

The growth areas are marked and sanded and cork material is added.

And after some time we'll have something like this. The lasts are shortened and the girth of the ball of the foot has already been modeled.

Whaaaat?! :D Yes, I'm serious! You're propably wondering why did I ruin them? Well, they're going to be boots so I thought of extending the shaft for a better fit. But it does look more like a terrifying sculpture than a last.

*Bling!* After a few hours of making friends with Mr. Grinder, Ms. Last became ready to be patternized ;)


Put a sock on it!!! Literally! This is a great way to see how they're really going to look like.
Next up with these boots is making some patterns and a mockup.

Monday, November 7

When you're fixing, do it right!

Ladies and gentlemen, for starters let's hit off with the marvelous rag time band:


And after my favourite band of the moment, we'll take a look at why I decided to do changes for Niina's lasts:

Here's the before and after shots. On the left you'll see a normal last, but it's meant for normal pumps and low shoes, rather than boots. With red I've marked the lines in which the shape should approximately go, and on your right you'll see the changes made. Why? Well let's see below:

In the circle you'll see a close up of the fitting I did for Niina, and you'll also notice the creases that for along the shaft of the boot. This is because the shape of the last is too steeply shaped from the upper part of the heel, as you can see on the picture to the left. This position is fixed properly on the boot to the right. This will lessen the creases and also make the front part alot more good looking and sturdy.

I'll hopefully get to try the left boot on Niina's feet before actually starting the manufacturing, this thursday?
The black boots are also due to begin their journey towards completion tomorrow, so we'll see what's up with them later this week. Have a good one!

Monday, October 31

Making High Heel Boots - Part 5 Fixing

There was only a few things to fix with Niina's lasts, but I managed to spend a good full 10 hours on them last weekend. Mostly because of my uncertainty about the changes. So I really had to sit down alot and think about what changes would affect which parts of the lasts, and how would that work while worn. All in all last shaping appears to be something magical, but it's not rocket science. It's bloody challenging and hard, but it's not too much so. It's a trickery between a few things: anatomy, bio-dynamics and aesthetics. And one has to find the perfect balance between them.

Let's see why:
I first circled the areas that needed some more mass. Just a few millimeters thick though.

Here's the cork/rubber sheet pieces glued on the lasts.


After smoothing out the excess and checking the measurements, I decided to go for a boot  styled lasts. So I attached a block of wood with a screw on it.

I grinded the meeting joint to zero and added a plastic "cup" on it. The idea is, that when you take the boot shaft out you'll still have lasts ready to be used for low cut shoes as the original lasts were meant for pumps, not boots. My bad.

I added a ridiculous amount of cork/eva sheets to the back and front, as I had barely a thought of what I was doing.

And there it is. Smooth shapes, and a last that now looks alot more like a boot last instead of  pumps. I decided also to make the shaft a lot lower, since it would've been a headache to figure out the measurements.


Next up, it's either having the second fitting, or I'm going to start to finish them. I haven't decided which.
Pahoitteluni kaikille suomenkielisille. Postaukseni menevät aina niin myöhäiseen että käännöksen pähkäily kaiken tämän päälle tuntuu usein ylivoimaiselta. Sori.

Thursday, October 20

The gentleman's detour: Balmoral boot.

While I'm mostly posting about making women's shoes, I've still a soft spot for gentlemen's shoes. Right now, HBO's incredible series about an american town and it's villain leader, the Boardwalk Empire inspires the hell outta me. It's filled with glorious dresses and shoes. And atmosphere. So I've had an itch to make a pair of balmoral boots for myself. Balmoral is basically an oxford cut boot, and dates back to the victorian 19th century. It's still a part of men's fashion, though maybe more concentrated on the more expensive dress shoe category.

Niina and Saku are coming for a visit in Helsinki on saturday, and I'm currently quite horrified and uncertain of the mockups's fit. Actually I'm quite sure she won't even get them on. Oh well, It's all the more experience for me ;) Also, tomorrow I'll order a pair of lasts for those knee high black heels.

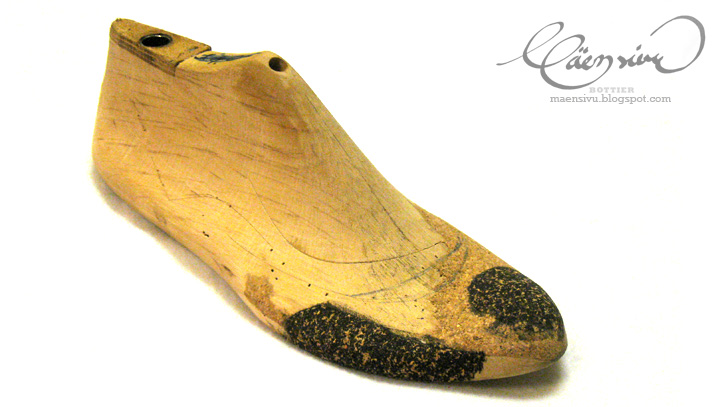
First some shaping of the lasts to my measurements.

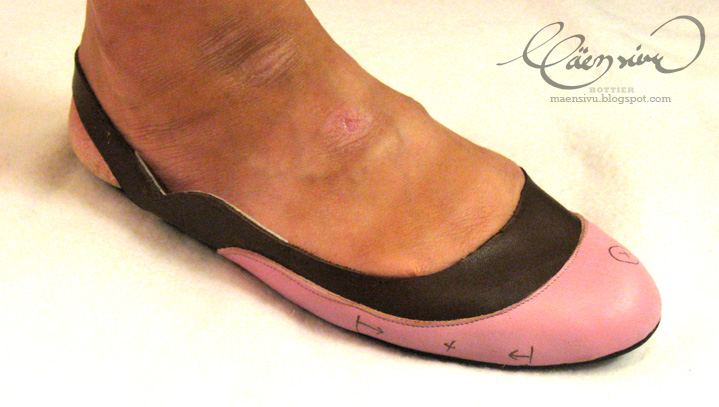
And some pattern drawing. It's quite a simple model but does have it's own tricks to make it fit the last.

After drawing patterns, cutting leathers, sewing uppers, making the insole, lasting and building of  a fake sole, they came out like this. Looking groovy!


They're a bit funny looking on me because of their length. Maybe I'll make em shorter?

Sunday, September 18

Making High Heel Boots - Part 1 The lasts

After taking the measurements, we pick a suitable last with the wanted heel height. For new readers I'd like to point out that the last is the most important aspect when making shoes: it defines the size, shape and even structural elements of what will eventually become a shoe. I will demonstrate some phases in which the lasts are reshaped to fit the clients measures. After all they're bespoke, which means they're made to measure :)
The lasts I ordered from the factory are like they're traditionally made: they're made of beech, which is a very hard, dense and stable wood. Ideal for lasts!

Let's take a look:

Here's what we'll start with: The last with some markings, a pen, some files for shaping and lots of courage :D Really, They look so fine already, so it's somewhat terrifying to start reshaping them. But it's gotta be done.

We can't forget the foot shape drawing and the measurements, now can we?

The drawing serves as a good base for defining shapes. This way we'll get an approximate on how the toes will fit etc.

The original was very chesty, as you can see on the left. The right one  has it's shapes redone.

The inner arch got some new, more anatomical shapes.
And of course you'll have to shape 'em both. Here they are, ready to be modeled into patterns.


Kenkiä tehtäessä tärkein valmistuksen elementti on lestit. Lesti määrää koko kengän muodon, sopivuuden sekä toiminnallisuuden. Aloitankin pyökkilesteillä, joissa on sovittu n. 7,5cm koronkorkeus. Lestit itsessään ovat jo niin upeat että niiden muokkaaminen pelottaa, mutta ne ovat niin rintavat että kaipaavat aika rankkaa muotoilua. Kyseessähän on kuitenkin mittatilaussaappaat. Urheasti taistoon!

Friday, August 19

Time for some tuning and repairs

Yesterday and today I've had two requests for shoe repairs from my wife, and some tidying of those marvellous vintage lasts I presented in the last post:

Warning! Contains a few bad quality shots. Darn it, my shaking hands...

First up was the rasping of the high heel lasts to get the shapes smooth and flowing.

Next, my wife asked to do some shoe magic and transform her red suede shoes to black because they didn't suite any of her clothing. No problem, madam! There's some thread for sewing the tips by hand, and some leather dye.

So I took the pretty shoes to my lap, and before dyeing they're always good to clean first. Use a suede brush if it's just dust.

Some vigorous brushing!

After cleaning, it was time to apply the dye with a cloth. Sorry for the bad shot.

For comparison, here's the before -> after shot.

They got a nice reddish black tone to them, and the stitching is still visibly red. Nice!

Then it was time to sew the tip rubbers by hand with a special hook.

The Paubellarinas had suffered, since I had made the rubber band too tight, and now they had lost their flexibility. Time for a change!
I decided to cut the bands abit longer, to see what kind of effect it'll have while worn.

Sunday, June 19

Making Ballerinas - Part 4 Fitting & Fixing

Fitting is quite an exciting moment: the shoe with it's basic elements get to be tested on your client and you'll get a more wholesome view on how the shoe will look and work while worn or walked with. When making bespoke shoes, it's rarely that one gets a perfect fit on the first try, so it's common that some small adjustments have to be done. In this chapter I'll show you some phases of fitting and fixing.

The fitting showed two main problems: the small toes are squashed on the shown area and the nail of the big toe needs more space.
The inner side of the ballerinas. You can see the needed toe space to the left and some changes to the uppers that I marked with red lines. The inner arch looks very fitting nevertheless.
So it's back to building! I took some 3mm rubber-cork mixture sheet and cut it to approximate size for the needed areas. Then both the last and the corks were glued.
And here they are, glued to the last.
After some careful shaping this is what I came up with.
The added shape is quite unnoticable, but will make a huge difference once the shoe is worn.
With the last fitting, the client is happy with the changes and we're ready to go!

Next up is the making of the actual uppers. See you in a few days!