Showing posts with label handicraft. Show all posts

Wednesday, August 31

Way way back in Lapland

Oh the memories! Digging through all these photos of the old objects of creation, brings back alot of them. I studied from '99 - '03 in Inari in The Sámi education institute, and I wanted to share some of the gems that I made during that period. The title I now possess is Artesan of Sámi handicrafts, and it took a good three years to become one.
I for one wasn't too enthusiastic about the education to begin with, but was rather dreaming of becoming an music instrument builder. With the handicraft education I merely wanted to learn basic craft skills, since I had none. That's right, none. I had only been drawing before crafting, exploring different techniques.
The first year was pretty boring, with a minimal focus on actual crafting. I felt fed up, since I didn't even have any favourite material nor real inspiration to focus on. During the second year, nonetheless, everything changed: I discovered the possibility of sculpting the reindeer antlers, and a completely new dimention opened. I could actually create small objects that were sculptures! In a frenzied hurry, I started making necklaces for friends and as gifts. Slowly I moved to bigger projects, and this all climaxed in my diploma screening: I had made a board game with 25 individually shaped small characters as playing pieces. Each character took about 6-14 hours of work and designing.
So the main materials for Sámi handicrafts are all natural, reindeer leather/fur, reindeer bone/antlers, wood and special woods. We even made our tools by learning the art of blacksmithery.

Let's take a look:
Left: A kiela which is used in the lasso of Sámi people, called as suopunki in finnish. I really grew fond of the bear design and made many variations of it in different objects.
Right: A traditional wooden cup kuksa which is made from a single piece of a wood burl. It was made by my teacher and master Ilmari Laiti. There's a story behind it: He had the cup almost ready, and he came to me saying: "Otso, you think yourself clever when it comes to design, so draw me how this antler piece should look on the handle", and gave the cup to me. So I drew a curvy line that really was a joke on my behalf. The next day he came with a ready inlaid antler on the handle, exactly like I had drawn, and said: "So now you can finish the decorations". :D Ok... I sat the whole weekend in my dormitory room with my pencil and tools, and this was what came of it :) I'm very pleased with the celtic themed swan carving as it's just perfect for the shape. Still on my top 10 of all the handicrafts I've done.

Left: A close up on the previously mentioned kuksa project.
Right: A matchbox...Well, more like a matchtube :) One of the latest works,  an order received from a friend as an anniversary gift for his wife. There's an hindu god Ganesh sitting in meditation on the lid. Love it <3 The engraving on the bottom part is also my own design.

The matchtube opened with a scratching surface glued to an antler piece inside it.

My diploma screening subjects: 16 of the 25 character pieces, each of them about 4 cm tall. Can you see my love for the detail? ;)

A close up on the finnish group of four mythological characters: (from the left) Kouko the ancestral bear, Väinämöinen the celestial hero of the finnish national epoch Kalevala, Joukahainen the young Sámi warrior also from Kalevala and Kokko an celestial eagle aiding in the creation of the world.

The irish mythological gang: (from the left) Aengus god of youth and love disguised here as an old man, Lug the deity of light holding a sword, Lia Fáil the coronation stone and Ethaun the fair maiden playing a harp. I used 0,5mm thick silver wire for her harp's strings and during the drilling of the middle string the drill broke so I couldn't attach it.

Oh, look at that skinny young hippie! :D It was the highlight of my studies, as at the end of my last year in Inari I was selected to be one of ten finalists in Paulig's tahto & taito (translates: will & skill) crafts competition! There were about 300 participants from all over the country, so this was a huge honor! The judges were long line professionals and teachers from the design/prod. field. Paulig is an old finnish coffee brand that's been adding focus on craftsmen and women for decades in their advertisements. Luckily I was smart enough to take a copy of their web pages, because they're non existant now :)
Here's a translation of the part "The judges arguments":
In this jewellery-like, tradition styled object one can clearly see the precision of craft
and the will for details in the ornamentation. The box was held as an perfect example
of the vanishing, detail respecting tradition which invokes stories with it's history.
This object that represents "great craftmanship" is decorative carving/sculpting
at it's finest.

And here's the box :) Funnily, I was the only one who hadn't given it any fancy name, so all around in the magazines and internet it read: "wooden box". :) I still think that's funny. What's it for? See the next pic.

It's a small box to keep a chanter reed (the long one in the middle) for my irish bagpipe (Uilleann pipes). There's also a compartment for guitar picks (right side) and another for swedish styled bagpipe reeds. Yup, that's right: the swedish have their own ;) The shell is from willow burl, and the rest are just engraved decorations from reindeer antler.
A detail of a decoration that I designed, though it's heavily styled after celtic ornamentation.
Whoa! That took some time :) There's lots and lots of pictures and stuff I've made through the years, and like I said before I just wanted to show you all some gems :)

Ah näitä muistoja! Ja niitä riitti kun kävin läpi tuotoksiani Inarin saamelaisalueen koulutuskeskuksen ajoilta '99 - '03. Poimin niistä parhaimpia; saamelaisen lasson osa kiela, mestarini Ilmari Laitin tekemä kuksa johon hän yhytti minut tekemään kaikki koristeet, hääpäivälahjaksi tilattu tulitikkuputkilo (perinteinen esine, muttei design :), päättötyönäin tekemän lautapelin käsinveistettyjä hahmoja sekä kermavaahtona vuoden 2003 Pauligin Tahto & Taito kisassa ollut puurasia joka vei minut kymmenen finalistin joukkoon.
Kyseessä on siis perinteiseen saamelaiseen käsityöhön (sámi duodji) pohjautuvaa ei-niin-perinteistä taidekäsityö esineistöä joista olen kaikki omin kätösin suunnitellut ja tehnyt. Noh, niin, paitsi sen kuksan mikä tulikin jo aikaisemmin mainittua.

Friday, July 8

Making Ballerinas - Part 8 Lasting

Lasting is the actualization of the shoe: the lasts and the insole merge with the uppers to create a three dimensional object: the shoe. It's done by placing the uppers on the last and pulling them tightly under the insole where they are attached to with contact glue. There's something magical and rewarding when you've lasted a pair of beautiful shoes. The previous phases of taking measures, designing, shaping the lasts, making the patterns, fixing the last and the patterns, cutting the leathers, sewing the uppers and making the insole come into completion in this phase. The shoe comes alive! Let's see how:


The uppers are placed on the last.

The side stiffeners receive some carpenters glue.

The first pull after checking that the back strap is at the correct height and the uppers are straight.

The uppers are attached to the insole from three key points, this is called the front pull.

At this point it's good to check out the upper side. If the uppers are straight then we can proceed. With this kind of design I thought it would be easier to nail the excess lining to the last so that they won't drop too low when pulling them.

Then the back part of the uppers and lining are glued and nailed. The front is left open so we can glue only the lining to the insole.

The uppers are lifted so that a toe stiffener made of leather can  be glued on the toe part.

After attaching and some grinding the toe stiffener is covered with carpenters glue.

And the upper is again turned on everything and some contact glue is applied. After this the uppers are attached and nailed to the insole systemically.

And voilá! It's a pair of shoes!

A side view.
And the ever lovely toe part with the bow.

Next up: building the outer sole! Almost finished!

Thursday, July 7

Making Ballerinas - Part 7 The insole

I'll make a mini post of this because the picture volume would've again been too much with lasting attached. Insole is a very important piece in a shoe, and you can find it basically from any shoe that's been lasted. The insole makes it possible to attach the uppers and lining beneath it, so this way it's possible to stretch them tightly on the last. This might not make any sense now, but it'll open to you soon.


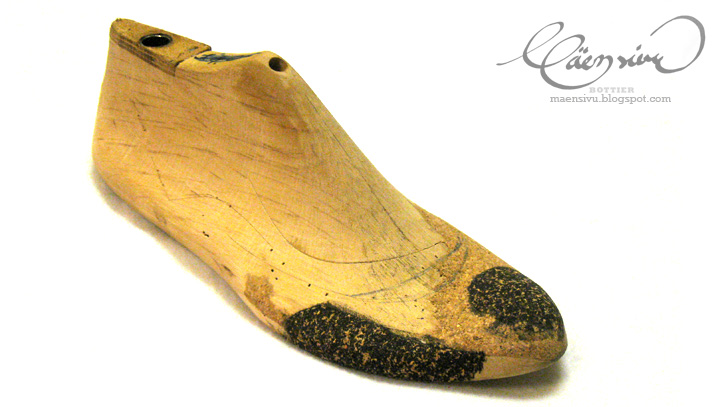
Here's the lasts to the left, in the middle and right you can see the leathers and the  synthetic stiffeners. Below is a pair of strong leather scissors for cutting, since the leather and the stiffeners are about 3mm thick. Both the leather and the stiffeners are cut from bigger sheets.

The stiffeners are glued to the leather and the insole is attached to the bottom of the last.  The insole is then cut to the precise shape of the last, and final shapes are grinded as seen in this picture. The upmost picture has the insole attached to it before grinding, and the lower shows how I shaped the edges to be about 1mm thick at most. This way, when the uppers are pulled over the last, the shoes appearance seems a lot slimmer. I left the backside thick, so it's look better when finished.

And here's how they look from down up.
Strips of alcantara are glued to the whole back part of the insole. This way we'll have a neat look to them when they're ready. The lower insole is what comes next to the last. Then they're attached to the lasts and we're ready for some lasting.

Next up, some lasting.

Sunday, July 3

Making Ballerinas - Part 5 The new design

At last! The project posts continue! It took me some time, but maybe after seeing it you'll understand why it takes relatively long time to make shoes. Especially if one has only his spare time to do them.
Anyhow, this post was originally meant to be longer but I had to split it in two parts because of it's image volume: 23. So, in this first part I'll just introduce to you all the fixed new design and some steps after. Enjoy.

Here you'll see the difference: the upper is the old design with the "wings" and below the fixed version that I'll make into the actual ballerinas. 


The different pattern pieces are copied through the basic copy to another cardboard.

Allowances and other markings are made with specific tools.

Holes are punched to guidance points. This will help you place the uppers in correct positions.

The templates are then cut out with a knife.

And here's all the templates we need to make the uppers :)

The templates are then used to draw them on the material of your choice.

All the templates are drawn. It's scissoring time!
And here's every piece ready for the next phase: skiving and sewing. My material choices were: regular cow leather on the front pieces, artificial suede called alcantara (used usually in car upholstery and couches) for the back pieces and goat leather for the linings. As a bonus there's vegetally tanned 1mm side stiffeners that'll... well, stiffen the sides :) They'll go hidden between the uppers and the lining. But more of that later.


Next up is the sewing and making the insole. See you soon!

Thursday, June 23

Some shoe designing & resting

Dear readers & visitors, I'd like to thank you all for your interest so far. My blog has launched pretty nicely and got some good attention from people, and it's a pity that I've been a bit under the weather for the past few days. I'd like to post more often and let you all see how the ballerinas are done, but the flue's taken my strength.
Anyways, a few days back I had a vision of two different high heels that I just had to draw down, and I thought that today's a great day to share them with you all. These kind of designs would maybe be something I'd have in my own boutique for sell, so tell me: would you buy yourself a pair?


On the left is a white leather bootie with a tattoo inspired drawing on it and the left is a pink/grey striped canvas boot. Maybe satin?The left shoe feels that it needs some more designing, but to the right one I'm very happy with!


*
I would like to wish all my readers a very very happy mid-summer festivities and a great weekend! I'll try to get some advancement posts done on the ballerina project in a few days.
Cheerio!

Sunday, June 19

Making Ballerinas - Part 4 Fitting & Fixing

Fitting is quite an exciting moment: the shoe with it's basic elements get to be tested on your client and you'll get a more wholesome view on how the shoe will look and work while worn or walked with. When making bespoke shoes, it's rarely that one gets a perfect fit on the first try, so it's common that some small adjustments have to be done. In this chapter I'll show you some phases of fitting and fixing.

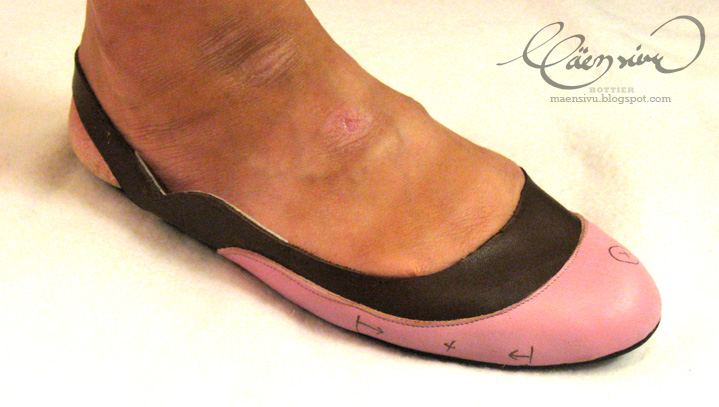
The fitting showed two main problems: the small toes are squashed on the shown area and the nail of the big toe needs more space.
The inner side of the ballerinas. You can see the needed toe space to the left and some changes to the uppers that I marked with red lines. The inner arch looks very fitting nevertheless.
So it's back to building! I took some 3mm rubber-cork mixture sheet and cut it to approximate size for the needed areas. Then both the last and the corks were glued.
And here they are, glued to the last.
After some careful shaping this is what I came up with.
The added shape is quite unnoticable, but will make a huge difference once the shoe is worn.
With the last fitting, the client is happy with the changes and we're ready to go!

Next up is the making of the actual uppers. See you in a few days!

Sunday, June 5

And away he went...

...But he came back! Mr. Shoemaker just took a cruise yesterday, and had the opportunity to try on those Spectators with an all black suit. And, even though the suit's nothing special, it brought the attention to the shoes quite nicely!

Luckily it's time for my trusted barber, Rody Maher in viisikulma, Helsinki to do his magic on my head, coz it's starting to look abit... hmm, bushy.

Thursday, June 2

Eallin


The leather soles came out great! Thank you Christian Loboutin for the idea ;)

OOps! The left stiching went baaad.  Well enough this was a test pair, and not a client work.


This is the vision I had, when I heard there was going to be a fashion exhibition in the Sámi Museum in Inari, in 2010. Back then I had just started to be very anxious and interested in high heels and the aesthetic possibilities they'd offer, so I had just a couple of months to design, draw patterns, make the uppers, last them and finally build a heel and glue the leather outer sole to them. These were also the first high heels I've done.

The uppers consist of two very exotic items; traditionally tanned reindeer leather called sisna and reindeer leg fur. Sisna is commonly used by the Sámi in clothing and accessories (bags, pouches), and sometimes for footwear too. This sisna had it's fur removed, vegetal tanning with willow bark, softening and oiling all done by me. It was part of the education program in the institute. Sisna has also a very fragile surface atleast for shoes, but a nice texture to it.
The leg furs are pretty amazing too, coz they're with a very short and smooth hair, a rare item of a summer reindeer. The leg part of the fur is traditionally used to make winter footwear called "nutukkaat". Got all my leg fur from a dear friend in lapland.

I shaped the heels from two blocks of oak which I got from slöjd detaljer. And added pieces of actual reindeer antlers to create a nice whitish effect to them. They were in the Reindeer Fashion exhibition for a few months. This was the first exhibition for me, and quite exciting!

-Otso